Introduction
Every minute, YouTube’s massive video library draws in countless viewers from around the world. The YouTube API offers numerous possibilities for app creators, particularly in managing and interacting with video content. This article guides you through integrating YouTube APIs with Java, offering a comprehensive approach to manipulating and accessing YouTube’s vast video content.
If you’re interested in Python or PHP integration, feel free to reach out in a comment section down below.
We’ll cover environment setup, API key acquisition, essential operations like data fetching and content uploading, and advanced features including video metadata editing and analytics. This tutorial suits both seasoned Java developers and newcomers to the YouTube platform, providing clear, step-by-step guidance. For more detailed information and specifics, refer to the YouTube API docs available on the Google Developers site.
Our focus here is on integrating YouTube APIs with Java to enhance your application’s capabilities.
Setting Up the Project on Google Developer Console
Grab Your YouTube API Key: The Golden Ticket
Setting up the proper credentials in the Google Developer Console is a pivotal step in integrating the YouTube API. In my video tutorial, I walk you through the entire process of navigating the Google Developer Console to create and configure a project specifically for YouTube API integration. Here are the key steps we cover:
- Creating a New Project: This is the starting point for any Google API integration. We name our project appropriately to identify it easily later.
- Enabling YouTube Data API v3: Essential for accessing YouTube’s vast data, we search for and enable this specific API.
- Note: If you want to fetch video analytics, you should also enable YouTube Analytics API.
- Configuring OAuth Consent Screen: Critical for user authentication, we provide details like the App name and User support email. This information appears when users are asked to give consent to our application.
- Setting Up Credentials: We create credentials suited to our application’s needs – OAuth client ID for user data access, or an API key for public data.
- Obtaining Client Secrets: The final step involves downloading the client secrets JSON file. This file contains sensitive data, including the Google client ID and secret, crucial for the OAuth flow in our Java application.
Demo: Video Dashboard Application
We will develop a Video Dashboard application, providing practical experience in using the YouTube API with Java.
This app will allow users to:
- View a list of videos from a specified YouTube channel.
- Upload new videos to the channel.
- View basic analytics of each video.
Setting Up Your Spring Boot Project with Spring Initializr
Spring Boot is a powerful framework that simplifies the bootstrapping and development of new Spring applications.
In this tutorial, I’ll demonstrate how to create a Spring Boot project using the Spring Initializr. This tool provides an easy and convenient way to set up a project structure with the necessary dependencies.
Here’s a step-by-step guide:
- Access Spring Initializr: Start by visiting https://start.spring.io/
- Project Configuration:
- Project: Choose between Maven and Gradle. In this tutorial, we’re using Maven for dependency management.
- Language: Select Java as the programming language for your project.
- Spring Boot Version: We should select the latest stable version for up-to-date features and improvements.
- Project Metadata: Fill in the details like Group, Artifact, Name, Description, and Package Name. These help identify your project and define its base package structure.
- Packaging: Select how you want to package your application. Typically, a JAR (Java ARchive) is used.
- Java Version: Choose the version of Java SDK you’re using. It’s important to ensure compatibility with the Spring Boot version and other dependencies.
- Adding Dependencies: Click on Add Dependencies and search for Spring Web. This is essential for building web applications, including RESTful applications, using Spring MVC.
- Generate Project:
- After configuring your project settings and dependencies, click on Generate to download a ZIP file containing your project skeleton.
- Extract the ZIP file and open the project in your preferred Java IDE, like IntelliJ IDEA.
- IDE Configuration:
- Once you open the project in IntelliJ IDEA, ensure that it recognizes the correct Java SDK version. This can be done by going to
File > Project Structureand confirming that the SDK version matches what you selected in Spring Initializr.
- Once you open the project in IntelliJ IDEA, ensure that it recognizes the correct Java SDK version. This can be done by going to
Organizing Project Structure and Managing Secrets
An organized project structure is key to efficient development. For our Java YouTube API application, we can follow a simple yet effective structure.
It’s important to securely handle sensitive data (like client secrets) when publishing or deploying your application.
Managing Google Client Secrets Securely
Storing the client_secrets.json file directly in your project, especially if it’s in a public repository, is not a recommended practice. For development, you can place it in the src/main/resources directory. However, for production or deployment, use environment variables or a secure secrets management service.
Here’s how to handle it:
- Development: Place
client_secrets.jsonin src/main/resources. Make sure to add it to your .gitignore file to prevent it from being pushed to your public repository. - Production: Use environment variables to store sensitive information. You can load these variables at runtime in your Java application.
This method keeps your important information safe and protects your application from potential risks related to exposed credentials.
Adding Google Dependencies to Our Project
Once our Spring Boot project is set up, the next step is to add specific dependencies to our pom.xml file. These dependencies ensure that your application has the necessary libraries to interact with the YouTube API and handle authentication processes.
- Google API Client Library: It includes essential tools for OAuth 2.0 authentication, crucial for accessing user data with proper authorization.
<dependency>
    <groupId>com.google.api-client</groupId>
    <artifactId>google-api-client</artifactId>
    <version>1.30.10</version>
</dependency>- YouTube Data API Client Library:
- Specifically tailored for interacting with the YouTube Data API.
- It simplifies tasks such as retrieving video details, managing playlists, and uploading content to YouTube.
<dependency>
    <groupId>com.google.apis</groupId>
    <artifactId>google-api-services-youtube</artifactId>
    <version>v3-rev222-1.25.0</version>
</dependency>- Google OAuth Client-Jetty: Used for implementing the OAuth 2.0 authorization flow.
<dependency>
    <groupId>com.google.oauth-client</groupId>
    <artifactId>google-oauth-client-jetty</artifactId>
    <version>1.32.1</version>
</dependency>- Google API Services OAuth2: Essential for applications that require authentication and authorization to access Google APIs on behalf of the user.
<dependency>
    <groupId>com.google.apis</groupId>
    <artifactId>google-api-services-oauth2</artifactId>
    <version>v2-rev157-1.25.0</version>
</dependency>
After adding these dependencies, it’s important to reload or synchronize your project in your IDE to ensure that all the newly added libraries are properly included.
Java authentication with YouTube API
Before we start making calls to the YouTube API, we need to establish a secure connection. This is where authentication comes into play.
The following Java code snippet demonstrates how to use OAuth 2.0 for authentication. It manages the authorization process and creates a YouTube service object for future API requests.
This process makes sure our app can use YouTube API for the user.
package com.youtube.api.auth;

import com.google.api.client.auth.oauth2.Credential;
import com.google.api.client.auth.oauth2.TokenResponse;
import com.google.api.client.googleapis.auth.oauth2.GoogleAuthorizationCodeFlow;
import com.google.api.client.googleapis.auth.oauth2.GoogleClientSecrets;
import com.google.api.client.http.HttpTransport;
import com.google.api.client.http.javanet.NetHttpTransport;
import com.google.api.client.json.JsonFactory;
import com.google.api.client.json.jackson2.JacksonFactory;

import java.io.IOException;
import java.io.InputStream;
import java.io.InputStreamReader;
import java.util.Arrays;
import java.util.Collection;

public class Auth {
    private static final JsonFactory JSON_FACTORY = JacksonFactory.getDefaultInstance();
    private static final HttpTransport HTTP_TRANSPORT = new NetHttpTransport();
    private static final Collection SCOPES = Arrays.asList(
        "https://www.googleapis.com/auth/youtube.readonly",
        "https://www.googleapis.com/auth/youtube.upload"
    );

    private static GoogleClientSecrets getSecrets() {
        InputStream in = Auth.class.getResourceAsStream("/client_secrets.json");
        try {
            return GoogleClientSecrets.load(
                JSON_FACTORY,
                new InputStreamReader(in)
            );
        } catch (IOException e) {
            System.out.println("Error when trying to load google client secrets...");
            throw new RuntimeException(e);
        }
    }

    private static GoogleAuthorizationCodeFlow buildGoogleFlow(
        GoogleClientSecrets googleClientSecrets
    ) {
        return new GoogleAuthorizationCodeFlow.Builder(
            HTTP_TRANSPORT,
            JSON_FACTORY,
            googleClientSecrets,
            SCOPES
        ).setAccessType("offline").build();
    }

    public static String getAuthorizationUrl() {
        GoogleClientSecrets googleClientSecrets = getSecrets();
        GoogleAuthorizationCodeFlow codeFlow = buildGoogleFlow(googleClientSecrets);

        return codeFlow.newAuthorizationUrl()
            .setRedirectUri(googleClientSecrets.getDetails().getRedirectUris()
                .get(0)).build();
    }

}
Now, let’s create a controller called OAuthController
package com.youtube.api.controller;

import com.google.api.client.auth.oauth2.Credential;
import com.google.api.client.auth.oauth2.TokenResponse;
import com.youtube.api.auth.Auth;
import com.youtube.api.service.YouTubeService;
import org.springframework.web.bind.annotation.GetMapping;
import org.springframework.web.bind.annotation.RequestParam;
import org.springframework.web.bind.annotation.RestController;
import org.springframework.web.servlet.view.RedirectView;

import java.io.IOException;

@RestController
public class OAuthController {

    @GetMapping("/authorize")
    public RedirectView authorize() {
        String viewUrl = Auth.getAuthorizationUrl();
        return new RedirectView(viewUrl);
    }

    @GetMapping("/Callback")
    public String callback(@RequestParam("code") String code) throws IOException {
        return "Callback endpoint has been executed!";
    }
}
To test the flow, we will need to create a simple GUI (Graphical User Interface) using Swing.
package com.youtube.api.ui;

import javax.swing.*;
import java.awt.*;
import java.awt.event.ActionEvent;
import java.awt.event.ActionListener;
import java.net.URI;

public class OAuthTestUI {
    public static void main(String[] args) {
        JFrame frame = new JFrame("YouTube API OAuth Test");
        JButton button = new JButton("Authenticate with Google");

        button.addActionListener(new ActionListener() {
            @Override
            public void actionPerformed(ActionEvent e) {
                try {
                    Desktop.getDesktop().browse(new URI("http://localhost:8080/authorize"));
                } catch (Exception ex) {
                    throw new RuntimeException(ex);
                }
            }
        });

        frame.setDefaultCloseOperation(JFrame.EXIT_ON_CLOSE);
        frame.setSize(350, 200);
        frame.setLayout(new FlowLayout());
        frame.add(button);
        frame.setVisible(true);
    }
}
Finally, let’s run both Back-End and Front-End (OAuthTestUI). Once we go through the flow, we will be prompted with a message: “Callback endpoint has been executed!“
Fetching and Displaying Videos
Once authenticated, our next step is to demonstrate data fetching using the YouTube Data API.
package com.youtube.api.service;
import com.google.api.client.auth.oauth2.Credential;
import com.google.api.client.http.HttpTransport;
import com.google.api.client.http.javanet.NetHttpTransport;
import com.google.api.client.json.JsonFactory;
import com.google.api.client.json.jackson2.JacksonFactory;
import com.google.api.services.youtube.YouTube;
import com.google.api.services.youtube.model.*;
import java.io.IOException;
import java.util.List;
import java.util.stream.Collectors;
public class YouTubeService {
private static final JsonFactory JSON_FACTORY = JacksonFactory.getDefaultInstance();
private static final HttpTransport HTTP_TRANSPORT = new NetHttpTransport();
private static YouTube initYouTube(Credential credential) {
return new YouTube.Builder(
HTTP_TRANSPORT,
JSON_FACTORY,
credential
).setApplicationName("YouTube API Application").build();
}
private static String getUploadsPlaylistId(YouTube youtube) throws IOException {
YouTube.Channels.List channelsListRequest = youtube.channels()
.list("contentDetails");
channelsListRequest.setMine(true);
ChannelListResponse channelsListResponse = channelsListRequest.execute();
if (channelsListResponse.getItems().isEmpty()) {
return null;
}
Channel channel = channelsListResponse.getItems().get(0);
return channel.getContentDetails()
.getRelatedPlaylists()
.getUploads();
}
private static List getVideoIds(YouTube youtube, String playlistId) throws IOException {
YouTube.PlaylistItems.List playlistRequest = youtube.playlistItems().list("snippet");
playlistRequest.setPlaylistId(playlistId);
PlaylistItemListResponse playlistResponse = playlistRequest.execute();
return playlistResponse.getItems().stream()
.map(item -> item.getSnippet().getResourceId().getVideoId())
.collect(Collectors.toList());
}
private static String formatVideoList(List Let’s alter OAuthController so it prints out the analytics:
package com.youtube.api.controller;

import com.google.api.client.auth.oauth2.Credential;
import com.google.api.client.auth.oauth2.TokenResponse;
import com.youtube.api.auth.Auth;
import com.youtube.api.service.YouTubeService;
import org.springframework.web.bind.annotation.GetMapping;
import org.springframework.web.bind.annotation.RequestParam;
import org.springframework.web.bind.annotation.RestController;
import org.springframework.web.servlet.view.RedirectView;

import java.io.IOException;

@RestController
public class OAuthController {

    // ... existing code

    @GetMapping("/Callback")
    public String callback(@RequestParam("code") String code) throws IOException {
        TokenResponse tokenResponse = Auth.exchangeCode(code);
        Credential credential = Auth.getCredentialsFromTokenResponse(tokenResponse);

        // Fetch and format the video list
        String videoList = YouTubeService.getVideoList(credential);

        return "Video analytics: \n\n" + videoList;
    }
}
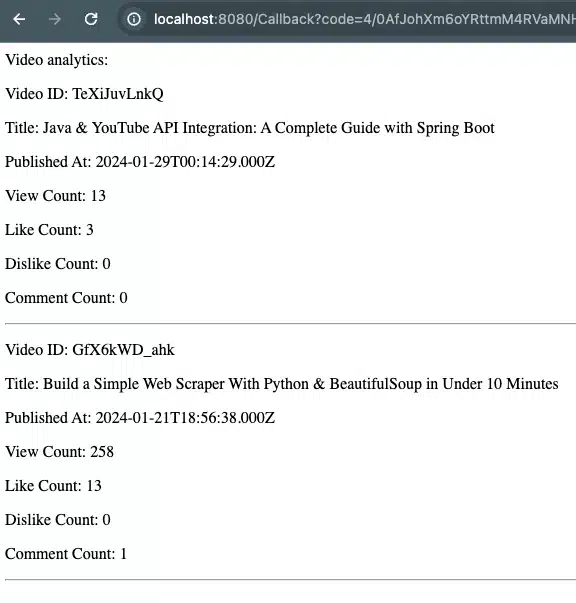
If we restart BE and UI, we will get a response that looks like this:

Learn more about data fetching in Python with my tutorial on Building Your First Web Scraper with Python and BeautifulSoup.
Integrating Video Upload Functionality
A key feature for many applications is uploading videos using the YouTube API. This snippet provides the Java code necessary to upload a video file to YouTube.
It shows how to set up video information, prepare the file, and upload it to YouTube’s servers.
In our, YouTubeService.java we’ll add a new method called uploadVideo.
package com.youtube.api.service;

import com.google.api.client.auth.oauth2.Credential;
import com.google.api.client.http.HttpTransport;
import com.google.api.client.http.javanet.NetHttpTransport;
import com.google.api.client.json.JsonFactory;
import com.google.api.client.json.jackson2.JacksonFactory;
import com.google.api.services.youtube.YouTube;
import com.google.api.services.youtube.model.*;
import com.google.api.services.youtube.model.VideoStatus;
import com.google.api.services.youtube.model.VideoSnippet;
import java.io.File;
import java.io.FileInputStream;
import java.io.BufferedInputStream;
import com.google.api.client.http.InputStreamContent;

import java.io.IOException;
import java.util.List;
import java.util.stream.Collectors;

public class YouTubeService {
    // ... existing code

    public static String uploadVideo(
        Credential credential,
        File videoFile,
        String title,
        String description
    ) throws IOException {
        YouTube youtube = initYouTube(credential);

        // Define video metadata
        Video videoObject = new Video();
        VideoStatus status = new VideoStatus();
        status.setPrivacyStatus("private"); // or "public" or "unlisted"
        videoObject.setStatus(status);

        VideoSnippet snippet = new VideoSnippet();
        snippet.setTitle(title);
        snippet.setDescription(description);
        videoObject.setSnippet(snippet);

        // Prepare the video file for upload
        InputStreamContent mediaContent = new InputStreamContent(
            "video/*",
            new BufferedInputStream(new FileInputStream(videoFile))
        );

        mediaContent.setLength(videoFile.length());

        // Upload video
        YouTube.Videos.Insert videoInsert = youtube.videos().insert(
            "snippet,statistics,status",
            videoObject,
            mediaContent
        );

        Video returnedVideo = videoInsert.execute();

        // Return video ID of the uploaded video
        return "Video Uploaded Successfully. Video ID is " + returnedVideo.getId();
    }
}
Next steps:
- Implement a new method,
saveCredentialsInSessionin theOAuthController. This method will store the user’s credentials following their authorization. - Create an HTML form designed for video uploads. This form will facilitate the process of uploading videos to the YouTube channel.
- Ensure that the option to upload a video is displayed immediately after the user completes the authorization process.
We will create an HTML form for video uploads and place it inside a file named video_upload.html. This file will be located in the resources/templates directory of our project.
<pre class="lang-html"><code>
<!DOCTYPE html>
<html>
<head>
    <title>Video Upload Form</title>
</head>
<body>
<h1>Upload a Video to YouTube</h1>
<form action="/video/upload" method="post" enctype="multipart/form-data">
    <label for="videoFile">Video File:</label>
    <input type="file" name="videoFile" id="videoFile" accept="video/*" required><br>
    <label for="videoTitle">Title:</label>
    <input type="text" name="videoTitle" id="videoTitle" required><br>
    <label for="videoDescription">Description:</label>
    <textarea name="videoDescription" id="videoDescription" rows="4" required></textarea><br>
    <input type="submit" value="Upload Video">
</form>
</body>
</html>
</code></pre>
In the callback function, I will invoke a new method designed to save the credentials and display the video upload form.
package com.youtube.api.controller;

import com.google.api.client.auth.oauth2.Credential;
import com.google.api.client.auth.oauth2.TokenResponse;
import com.youtube.api.auth.Auth;
import jakarta.servlet.http.HttpSession;
import org.springframework.web.bind.annotation.GetMapping;
import org.springframework.web.bind.annotation.RequestParam;
import org.springframework.web.bind.annotation.RestController;
import org.springframework.web.servlet.view.RedirectView;

import java.io.IOException;

@RestController
public class OAuthController {

    // ... existing code
    @GetMapping("/Callback")
    public String callback(@RequestParam("code") String code, HttpSession session) throws IOException {
        TokenResponse tokenResponse = Auth.exchangeCode(code);
        Credential credential = Auth.getCredentialsFromTokenResponse(tokenResponse);

        // Save credentials in session
        Auth.saveCredentialsInSession(credential, session);

        return generateVideoUploadForm();
    }

        private String generateVideoUploadForm() {
        try {
            // Read the HTML content from the file
            ClassPathResource resource = new ClassPathResource("templates/video_upload.html");
            byte[] htmlBytes = FileCopyUtils.copyToByteArray(resource.getInputStream());
            String htmlForm = new String(htmlBytes, "UTF-8");

            return htmlForm;
        } catch (IOException e) {
            e.printStackTrace();
            return "Error occurred while reading the HTML file.";
        }
    }
}
Inside our Auth class, let’s add:
package com.youtube.api.auth;

import com.google.api.client.auth.oauth2.Credential;
import com.google.api.client.auth.oauth2.TokenResponse;
import com.google.api.client.googleapis.auth.oauth2.GoogleAuthorizationCodeFlow;
import com.google.api.client.googleapis.auth.oauth2.GoogleClientSecrets;
import com.google.api.client.http.HttpTransport;
import com.google.api.client.http.javanet.NetHttpTransport;
import com.google.api.client.json.JsonFactory;
import com.google.api.client.json.jackson2.JacksonFactory;
import jakarta.servlet.http.HttpSession;

import java.io.IOException;
import java.io.InputStream;
import java.io.InputStreamReader;
import java.util.Arrays;
import java.util.Collection;

public class Auth {
    // ... existing code

    public static void saveCredentialsInSession(Credential credential, HttpSession session) {
        session.setAttribute("credentials", credential);
    }

    public static Credential getCredentialsFromSession(HttpSession session) {
        return (Credential) session.getAttribute("credentials");
    }
}
Finally, we will implement a new Controller dedicated to managing the video upload process.
package com.youtube.api.controller;

import com.google.api.client.auth.oauth2.Credential;
import com.youtube.api.auth.Auth;
import com.youtube.api.service.YouTubeService;
import jakarta.servlet.http.HttpSession;
import org.springframework.http.HttpStatus;
import org.springframework.web.bind.annotation.*;
import org.springframework.web.multipart.MultipartFile;
import org.springframework.web.server.ResponseStatusException;

import java.io.IOException;
import java.nio.file.Files;
import java.nio.file.Path;


@RequestMapping("video")
@RestController
public class VideoController {

    @PostMapping("upload")
    public String uploadVideo(
        @RequestParam("videoTitle") String title,
        @RequestParam("videoDescription") String description,
        @RequestPart("videoFile") MultipartFile videoFile,
        HttpSession session
    ) {
        try {
            // Save the uploaded file to a temporary location
            Path tempFilePath = Files.createTempFile("upload-", ".tmp");
            videoFile.transferTo(tempFilePath);

            // Retrieve stored credentials from session
            Credential credential = Auth.getCredentialsFromSession(session);
            if (credential == null) {
                throw new ResponseStatusException(
                    HttpStatus.UNAUTHORIZED,
                    "User not authenticated"
                );
            }

            // Call YouTubeService to upload the video
            String response = YouTubeService.uploadVideo(
                credential,
                tempFilePath.toFile(),
                title,
                description
            );

            // Cleanup: Delete the temporary file
            Files.delete(tempFilePath);
            return response;
        } catch (IOException e) {
            e.printStackTrace();
            return "Error occurred during video upload: " + e.getMessage();
        }
    }

}
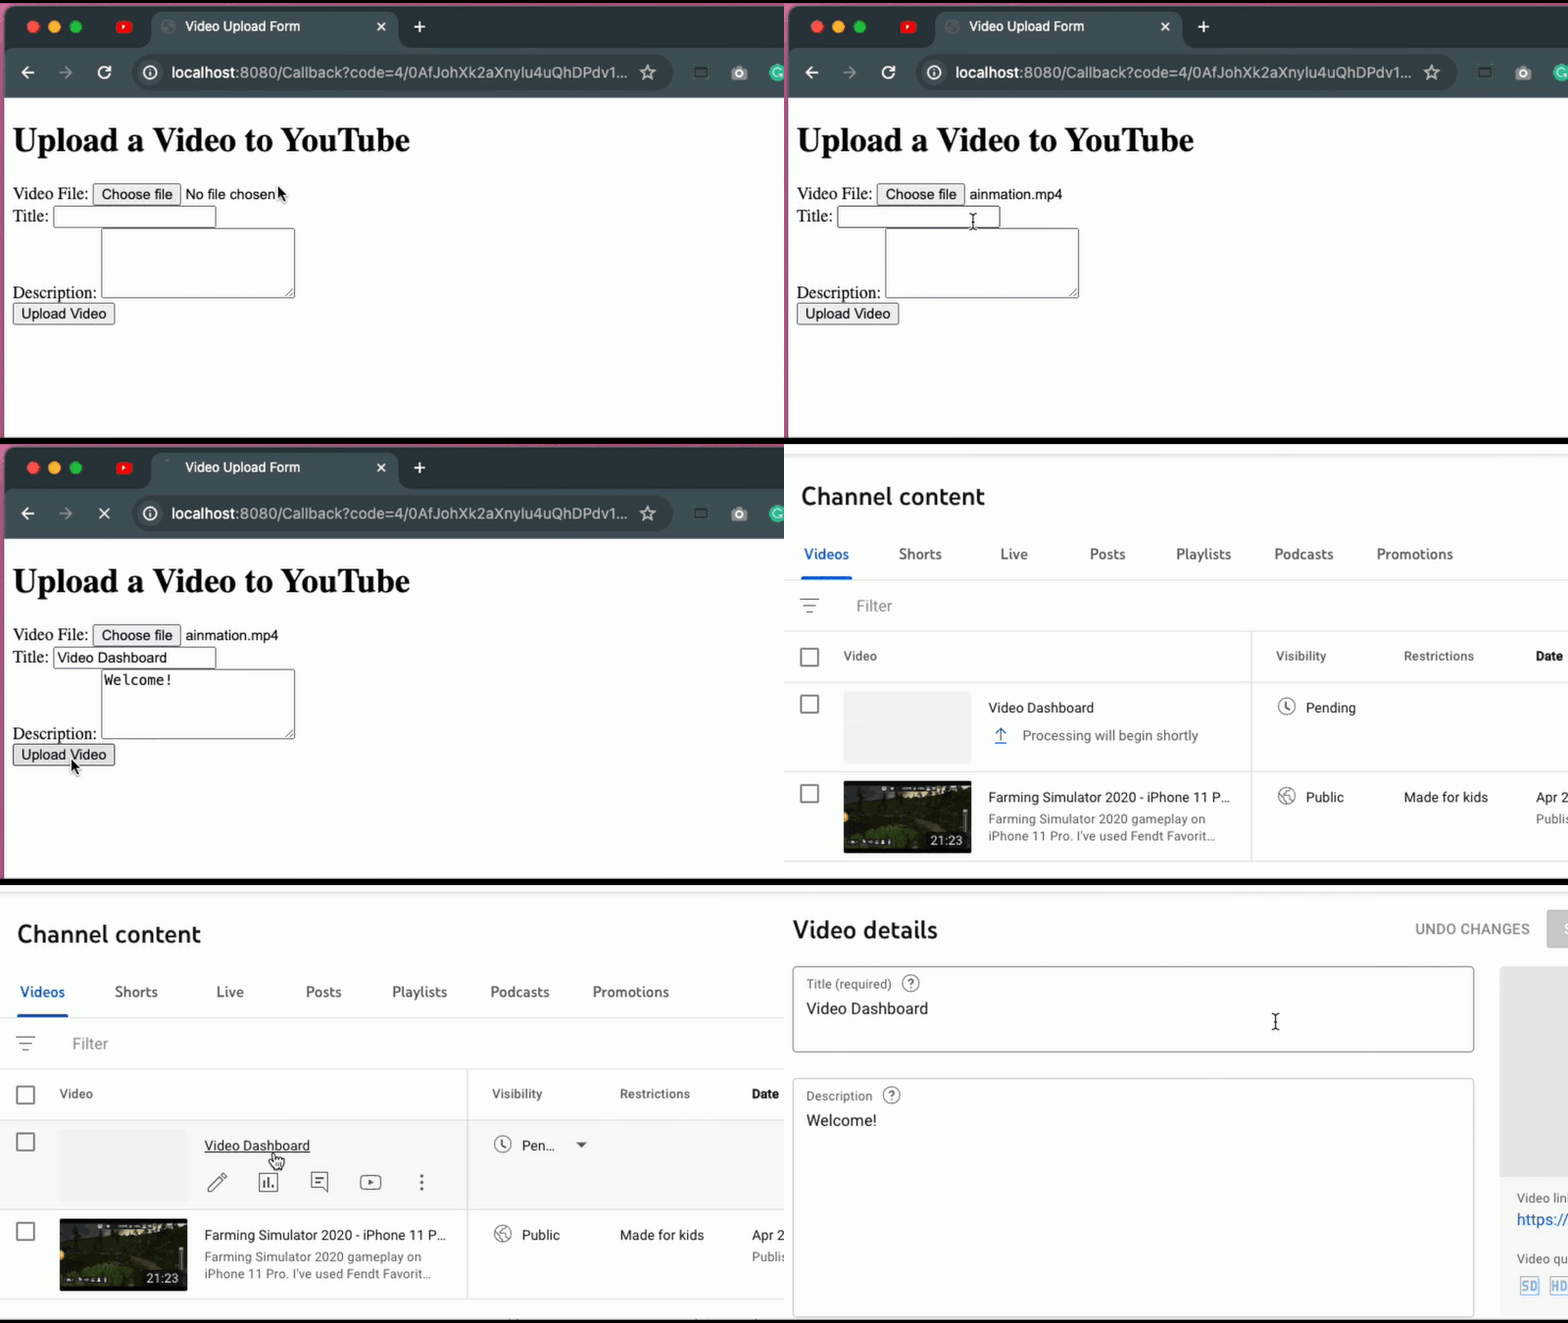
Now, upon starting the application, this is the interface that will be presented to the user:

Conclusion
For a practical start, you can access the full project code on my GitHub repository.
Thank you for following this tutorial. I hope it was helpful. In the next article, we’ll dive into more topics related to technology and development. Looking forward to sharing more with you then!


